Vue
History of Website
- 1990s 世界上出現的第一個網站 By Tim Berners Lee [靜態網頁]
- 2000s Web2.0 founded (Facebook&Youtube)[*ajax]
- 2010s 網頁應用程式(Web Application)(高互動性) ***前端框架出現
前端框架ㄉ種類
- Angular(2010)
- React(2013)
- Vue(2014)
 可以看更多
可以看更多
ajax 小知識:
ajax(Asynchronous JavaScript and XML) 非同步的 JavaScript&XML 的縮寫,讓網頁可以透過 js 而非 browser 來發送請求 [不用 refresh] 簡單來說,以前的網頁在發送請求(表單)的時候,伺服器接受請求後會送回一個“網頁”回來,但這也浪費許多頻寬(前後 HTML 的內容大致相同)與時間(在 server 上處理完才回應);當 ajax 技術出現後,客戶端需要什麼再向伺服器請求即可(不需要發送整個表單),而伺服器只需回傳客戶端需要的資料就行了
讓我們簡單回顧一下前端
前端三巨頭

讓我們進到今天的主題
What's Vue?

Vue 是一個以視圖層為基礎發展的 JavaScript 漸進式框架。
漸進式框架:
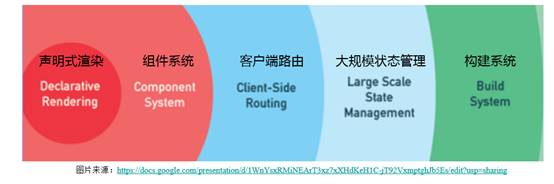
聲明式渲染
以簡潔的模板語法將資料渲染進 DOM 看看範例ㄅ
簡單來說 在範例中的{{message}}跟 v-model 就是最好體現聲明式渲染的例子
*{{}}我們稱為「鬍子語法」
組件系統
- 自定義元素
- 可重複使用的 code
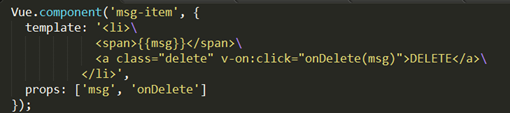 可以使用 Vue.componment 定義組件
但是較複雜的 project 會使用*.vue 定義(單文件)組件
以上兩個為核心
可以使用 Vue.componment 定義組件
但是較複雜的 project 會使用*.vue 定義(單文件)組件
以上兩個為核心
Vue Componment 架構介紹
全域/區域註冊
全域註冊不管怎樣都會 load
區域(局部)註冊選項物件,可以 components 引入 vue 實例
Vue.component('my-component', {
  template: `<div>Hello Vue!</div>`,
  data () {},
  props: {},
  computed: {},
  methods: {},
});
const vm = new Vue({ }).$mount('#app');
template:模板(引入 HTML 字串模板) computed:計算屬性 methods:HTML 的功能、互動「非同步事件」 因為 Vue.js 每個元件的實體狀態、模板等作用範圍必須是獨立的,因此無法以子元件「直接」去修改父元件 那麼,既然不能直接修改,那麼上下層元件之間,若需要從外部引進資料時,就需要透過 props 引用外部的狀態

.vue
客戶端路由_vue-router
- 定義路由

- router-link

大規模狀態管理
Vuex
可集中管理各元件的資料,一般用於大專案 *使用單一狀態樹(管理所有組件狀態)

action, multation, state??

- state 是存放資料的地方。
- action 處理非同步事件&取得遠端資料 [**不負責處理資料內容的改變]
- getter 在畫面渲染前,先對資料進行運算及過濾等。
- mutation 用於改變資料的內容。在 Vue 元件中我們習慣在 methods 中去改變資料,現在用了 Vuex 則是在 mutation 進行處理。
構建系統
- Vue CLI Webpack (Vue.js Command-Line Interface) 是提供開發者在短短的幾分鐘時間內,即可快速建置一個立即可用的 Vue.js (含 2.x/3.x) 示範專案
講了這麼多 重點基本上就是這些
Vue是一個框架,透過這個框架,可以輕易做出一個webpage
並且根據需要,可以增加需要的功能來加以呈現
Vue 基本語法(2.0)
Create a html file =>
mkdir test
cd test
touch test.html
code .
<!DOCTYPE html>
<html lang="en">
<head>
  <meta charset="UTF-8">
   <script src="https://unpkg.com/vue/dist/vue.js"></script>
</head>
<body>
  <div id="app">
    <div class="input">
      <input v-model='message' placeholder="輸入訊息">
    </div>
    <p>{{message}}</p>
  </div>
</body>
</html>

<script>
  var app = new Vue({
    el:'#app',
    data(){
      return{
        message:''
      }
    }
  });
</script>
當我們在 browser 打上
console.log(app.message)
那各位試試看打入這ㄍ看會發生什麼事
app.message="xoxo"
單/雙向綁定
- 單向綁定 當使用者更新畫面的 info 時,data 並不會自動更新
- 雙向綁定 當使用者更新畫面的 info 時,data 會自動更新(v-model)
Special Attributes of Vue
以v-為前綴的特殊語法
v-bind
控制 object 的屬性
JS
  var app = new Vue({
    el:'#app',
    data(){
      return{
        isBtnDisabled: false,
      }
    },
    methods: {
        clickEvent:function(){
            alert("Hello~");
        }
    },
  });
tips:"v-bind:" = ":"
v-model
常用於表單及元素來做雙向數據綁定 除了初始綁定、顯示資料外,最主要是可“監聽”事件
JS
var app = new Vue({
    el:'#app',
    data(){
      return{
        message:''
      }
    }
  });
v-for
用於渲染元素 or 模板內容
JS
var app = new Vue({
  el: '#app',
  data: {
    todos: [
      { text: 'Learn JavaScript' },
      { text: 'Learn Vue' },
      { text: 'Build something awesome' }
    ]
  }
})
v-on
用於監聽 DOM 事件,並在事件發生時執行 js 指令
JS
var app = new Vue({
  el: '#app',
  data: {
    message: 'Hello Vue.js!'
  },
  methods: {
    reverseMessage: function () {
      this.message = this.message.split('').reverse().join('')
    }
  }
})
v-if
用以顯示或隱藏模板中的元素 可與"v-else","v-else-if"結合使用
JS
var app = new Vue({
  el: '#app',
  data: {
    seen: true
  }
})
試著把 true=>false
v-show
效果大致與 v-if 相同 但判斷條件較簡單=>true 就顯示,false 就不顯示
JS
var app = new Vue({
  el: '#app',
  data: {
    isShow: true
  }
})
v-if vs v-show
- For use -- "else"
- For HTML rendering -- v-if 有“條件”的渲染 v-show 無條件渲染
- <-template-> 必須使用 v-if 決定是否出現 (v-show X)
Let's go to next chapater...
Vue CLI environment create
Check Vue version
vue -V
or
vue --version (二選一)
如果沒有的話...點這裡
首先當然是建立 project 啦~~~
vue create "專案名稱"
中間的過程略,但可稍微解釋細節
在建完專案後,各位應該會看到這個畫面
🎉  Successfully created project review.
👉  Get started with the following commands:

 $ cd review
 $ yarn serve
serve 這個指令就是讓開發者可以以靜態 node.js 伺服器直接在本機預覽 project
code .
OK~ The class is ended.